
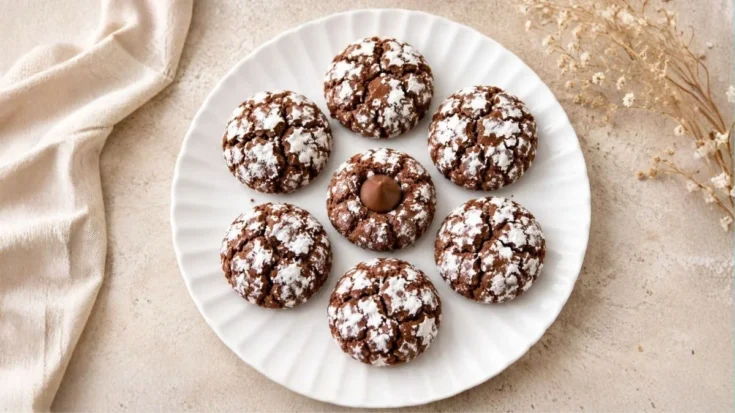
Rich, chocolatey, and topped with a classic Hershey’s Kiss, this chocolate kisses cookies recipe is a delightful treat that never goes out of style. The combination of a soft cocoa cookie and creamy milk chocolate center creates a dessert that’s both beautiful and delicious.
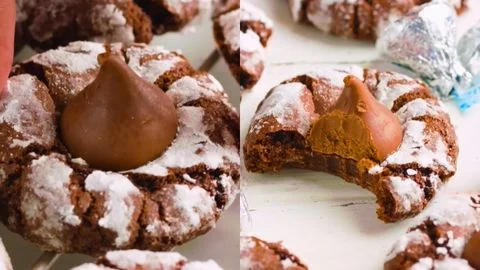
These cookies feature a crackled powdered sugar coating that gives them an eye-catching bakery-style appearance. The contrast between the fudgy interior and the smooth chocolate topping makes every bite incredibly satisfying.
Perfect for holiday cookie trays, family gatherings, bake sales, or weekend baking sessions, these chocolate kiss cookies are easy to make and always a crowd-pleaser. Serve with milk, ice cream, fruit dip, reese’s peanut butter temptations for dessert spreads ideas
My Experience and How Does This Recipe Taste
The first time I made these chocolate kiss cookies, I was amazed by how rich and decadent they tasted. The cocoa powder creates an intense chocolate flavor that pairs perfectly with the smooth milk chocolate Hershey’s Kiss pressed into the center.

The texture is what truly makes these cookies special. The outside develops a delicate crackled appearance thanks to the powdered sugar coating, while the inside stays soft, moist, and almost brownie-like. Every bite offers a wonderful contrast between the tender cookie and the creamy chocolate topping.
Another thing I love about this recipe is its versatility. These cookies look festive enough for holiday cookie trays yet simple enough for an afternoon baking project. They’re always among the first desserts to disappear whenever I serve them to family and friends.
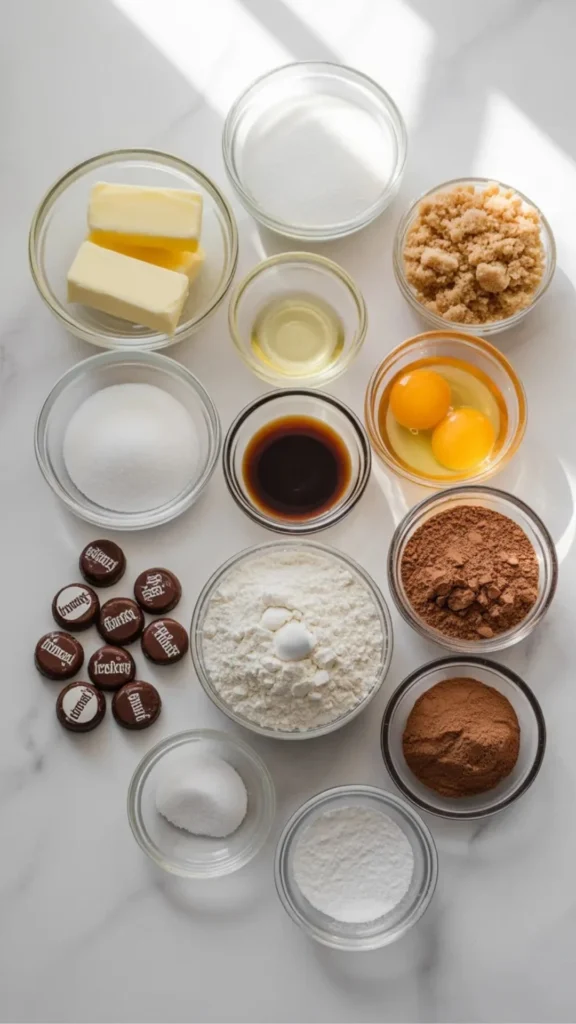
Chocolate Kisses Cookies Ingredients
Wet Ingredients
- 12 tablespoons softened salted butter
- 1 ½ cups granulated sugar
- ½ cup brown sugar
- 4 eggs
- 2 teaspoons vanilla extract
Dry Ingredients
- 2 ½ cups all-purpose flour
- 1 cup cocoa powder
- 1 tablespoon baking powder
- ¾ teaspoon salt
For Coating and Topping
- Powdered sugar, for rolling
- Hershey’s Kisses (one for each cookie)
Kitchen Utensils Needed
- Stand mixer or hand mixer
- Large mixing bowl
- Medium mixing bowl
- Measuring cups and spoons
- Rubber spatula
- Plastic wrap
- Cookie scoop or tablespoon
- Baking sheet
- Parchment paper
- Cooling rack
Preparation and Cooking Time
- Preparation Time: 20 minutes
- Chilling Time: 4 hours
- Baking Time: 10–12 minutes
- Total Time: Approximately 4 hours 35 minutes
- Servings: 30–36 cookies
Chocolate Kisses Cookies Recipe Steps
Step 1: Cream the Butter and Sugars
Place the softened salted butter, granulated sugar, and brown sugar into the bowl of a stand mixer. Beat until the mixture becomes light and creamy.
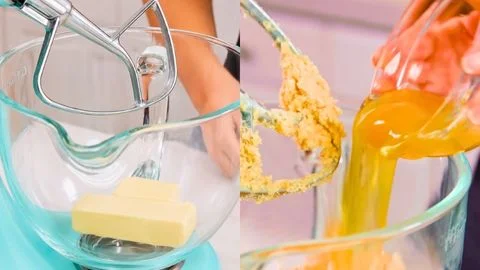
Step 2: Add Eggs and Vanilla
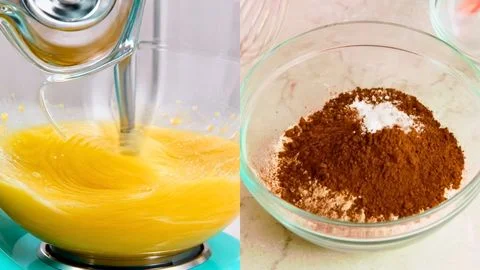
Add the eggs one at a time, followed by the vanilla extract. Continue mixing until the batter becomes smooth and fully combined.
Step 3: Combine the Dry Ingredients
In a separate bowl, whisk together the all-purpose flour, cocoa powder, baking powder, and salt until evenly distributed.
Step 4: Mix Wet and Dry Ingredients
Gradually add the dry ingredients to the wet mixture, about one-third at a time. Mix thoroughly between additions. The dough will be quite wet and sticky.
Step 5: Chill the Dough
Transfer the dough onto plastic wrap using a rubber spatula. Wrap tightly and refrigerate for at least 4 hours or overnight.
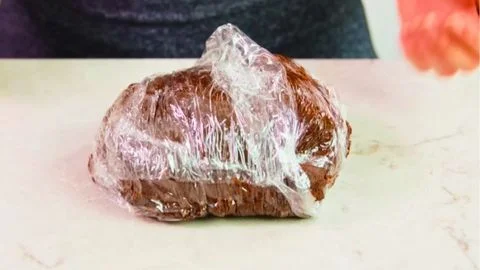
This step is essential for easier handling and better cookie texture.
Step 6: Prepare for Baking
Preheat the oven to 350°F (175°C). Line baking sheets with parchment paper.

Step 7: Shape the Cookies
Scoop approximately 1½ tablespoons of dough and roll into balls. Generously coat each dough ball in powdered sugar.
Step 8: Bake the Cookies
Arrange the coated dough balls on the prepared baking sheet, leaving space between each cookie. Bake for 10–12 minutes.
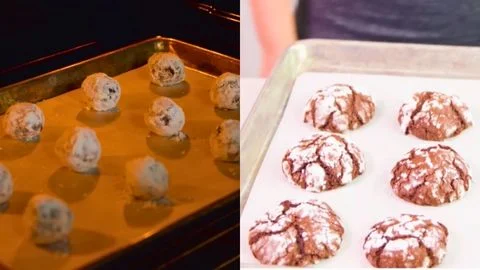
Step 9: Add the Chocolate Kisses
While the cookies bake, unwrap the Hershey’s Kisses. Immediately after removing the cookies from the oven, gently press one chocolate kiss into the center of each cookie.
Step 10: Cool and Serve
Allow the cookies to cool completely on the baking sheet before transferring them. Serve and enjoy your delicious chocolate kisses cookies.
Customization and Pairing Ideas
For a fun twist, try using dark chocolate or caramel-filled Kisses. These cookies pair wonderfully with hot chocolate, coffee, or vanilla ice cream, creating a rich and satisfying dessert experience.
1. Use Dark Chocolate Kisses
For a richer flavor profile, substitute regular Hershey’s Kisses with dark chocolate versions. This creates a more intense chocolate experience.
2. Add Espresso Powder
Mix a teaspoon of espresso powder into the dry ingredients. Coffee naturally enhances chocolate flavor without making the cookies taste like coffee.
3. Include Chocolate Chips
Fold semi-sweet or milk chocolate chips into the dough for extra bursts of chocolate in every bite.
4. Add Crushed Peppermint
During the holiday season, sprinkle crushed peppermint candy over the cookies immediately after adding the chocolate kisses for a festive twist.
5. Serve with Hot Chocolate
Pair these cookies with a warm mug of hot chocolate for the ultimate chocolate lover’s dessert experience.
6. Enjoy with Vanilla Ice Cream
Turn these cookies into a simple dessert platter by serving them alongside vanilla ice cream. The cold, creamy texture balances the rich chocolate flavor beautifully.
7. Create a Holiday Cookie Tray
Combine these chocolate kiss cookies with sugar cookies, gingerbread cookies, and peanut butter blossoms for a colorful and impressive holiday cookie assortment.

Helpful Tips for the Best Chocolate Kisses Cookies
I made these chocolate kisses cookies for a family gathering, and they disappeared quickly. Everyone loved the soft chocolate texture and sweet Hershey’s Kiss center, making them an instant favorite. Here are some Tips for the Best Chocolate Kisses Cookies.
1. Don’t Skip the Chilling Time
The dough for these chocolate kisses cookies is quite sticky. Chilling it for at least 4 hours helps the cookies hold their shape while baking and makes the dough much easier to handle.
2. Use Softened Butter
Make sure your butter is softened to room temperature, not melted. Properly softened butter creams better with the sugars, creating a lighter and more tender cookie texture.
3. Coat Generously with Powdered Sugar
For that beautiful crackled appearance, roll each dough ball generously in powdered sugar. A thick coating creates the signature snowy look after baking.
4. Measure Cocoa Powder Correctly
Too much cocoa powder can make the cookies dry. Spoon the cocoa powder into your measuring cup and level it off instead of scooping directly from the container.
5. Avoid Overbaking
Bake the cookies for only 10 to 12 minutes. They may appear slightly soft in the center when removed from the oven, but they will continue to set as they cool.
6. Add the Hershey’s Kiss Immediately
Press the Hershey’s Kiss into each cookie as soon as they come out of the oven. The warm cookies allow the chocolate to settle perfectly without melting completely.
7. Let the Cookies Cool Completely
Resist the temptation to move the cookies right away. Allowing them to cool completely on the baking sheet helps them firm up and prevents breaking.

Storage and Reheating Guidance
Store the cookies in an airtight container at room temperature for up to 5 days. For longer storage, freeze them for up to 3 months. Allow frozen cookies to thaw at room temperature before serving. If desired, warm them in the microwave for 5–10 seconds to soften the chocolate center.
Frequently Asked Questions
Common Chocolate Kisses Cookies Recipe questions answered to help you understand it better.
1. How do I stop the Kisses from turning white?
From our experience, the white discoloration, often called chocolate bloom, happens when the Hershey’s Kisses go through temperature changes. To prevent this, let the cookies cool at room temperature and avoid placing them in the refrigerator immediately after baking.
2. Why is the chocolate falling off the cookie?
We’ve found that this usually happens when the cookies cool too much before adding the Hershey’s Kisses. Press the chocolate into the cookies as soon as they come out of the oven so it adheres properly as the cookie sets.
3. Why are my chocolate kisses melting into a puddle?
In our testing, this can happen if the cookies are extremely hot or if the baking sheet remains very warm. Let the cookies sit for about a minute after baking before pressing in the Kisses. They should soften slightly but still hold their shape.
4. Can I make the dough ahead of time?
Yes. We often prepare the dough the night before baking. Chilling overnight actually improves the flavor and makes the sticky dough much easier to handle.
5. Can I freeze chocolate kisses cookie dough?
Absolutely. We like freezing the dough balls before rolling them in powdered sugar. When ready to bake, thaw slightly, coat in sugar, and bake as directed.
6. Why did my cookies spread too much?
The most common reason we’ve seen is insufficient chilling time. Since this dough is quite soft, refrigerating it for at least 4 hours helps the cookies maintain their shape.
7. Can I use unsalted butter instead of salted butter?
Yes. We’ve made this recipe with unsalted butter many times. Simply add an extra pinch of salt to maintain the same balanced flavor.
8. How do I get a more pronounced crackled appearance?
Our best tip is to coat the dough balls generously with powdered sugar. A thick layer creates the beautiful crackled effect that makes these cookies so attractive.
9. What type of cocoa powder works best?
We’ve had excellent results with natural unsweetened cocoa powder. It provides a rich chocolate flavor and gives the cookies their deep, dark color.
10. How long do chocolate kisses cookies stay fresh?
In our experience, these cookies stay soft and delicious for up to 5 days when stored in an airtight container at room temperature. They also freeze very well for longer storage.
Chocolate Kisses Cookies Recipe
Rich, chocolatey, and topped with a classic Hershey’s Kiss, this chocolate kisses cookies recipe is a delightful treat that never goes out of style. The combination of a soft cocoa cookie and creamy milk chocolate center creates a dessert that’s both beautiful and delicious. These cookies feature a crackled powdered sugar coating that gives them an eye-catching bakery-style appearance. The contrast between the fudgy interior and the smooth chocolate topping makes every bite incredibly satisfying.
Ingredients
- 12 tablespoons softened salted butter
- 1 ½ cups granulated sugar
- ½ cup brown sugar
- 4 eggs
- 2 teaspoons vanilla extract
- 2 ½ cups all-purpose flour
- 1 cup cocoa powder
- 1 tablespoon baking powder
- ¾ teaspoon salt
- Powdered sugar, for rolling
- Hershey’s Kisses (one for each cookie)
Instructions
Step 1: Cream the Butter and Sugars
Place the softened salted butter, granulated sugar, and brown sugar into the bowl of a stand mixer. Beat until the mixture becomes light and creamy.
Step 2: Add Eggs and Vanilla
Add the eggs one at a time, followed by the vanilla extract. Continue mixing until the batter becomes smooth and fully combined.
Step 3: Combine the Dry Ingredients
In a separate bowl, whisk together the all-purpose flour, cocoa powder, baking powder, and salt until evenly distributed.
Step 4: Mix Wet and Dry Ingredients
Gradually add the dry ingredients to the wet mixture, about one-third at a time. Mix thoroughly between additions. The dough will be quite wet and sticky.
Step 5: Chill the Dough
Transfer the dough onto plastic wrap using a rubber spatula. Wrap tightly and refrigerate for at least 4 hours or overnight. This step is essential for easier handling and better cookie texture.
Step 6: Prepare for Baking
Preheat the oven to 350°F (175°C). Line baking sheets with parchment paper.
Step 7: Shape the Cookies
Scoop approximately 1½ tablespoons of dough and roll into balls. Generously coat each dough ball in powdered sugar.
Step 8: Bake the Cookies
Arrange the coated dough balls on the prepared baking sheet, leaving space between each cookie. Bake for 10–12 minutes.
Step 9: Add the Chocolate Kisses
While the cookies bake, unwrap the Hershey’s Kisses. Immediately after removing the cookies from the oven, gently press one chocolate kiss into the center of each cookie
Step 10: Cool and Serve
Allow the cookies to cool completely on the baking sheet before transferring them. Serve and enjoy your delicious chocolate kisses cookies.
Notes
Store the cookies in an airtight container at room temperature for up to 5 days. For longer storage, freeze them for up to 3 months. Allow frozen cookies to thaw at room temperature before serving. If desired, warm them in the microwave for 5–10 seconds to soften the chocolate center.
Nutrition Information:
Yield:
15Serving Size:
1Amount Per Serving: Calories: 180
Give this recipe a try and let us know how your batch turns out. Don’t forget to share it with fellow chocolate lovers and save it for your next baking adventure!
I’d love to hear your thoughts-leave a comment on the blog and let me know How it came out! Don’t forget to follow me on Pinterest, Facebook and YouTube for more delicious updates. Your support truly means everything to me.