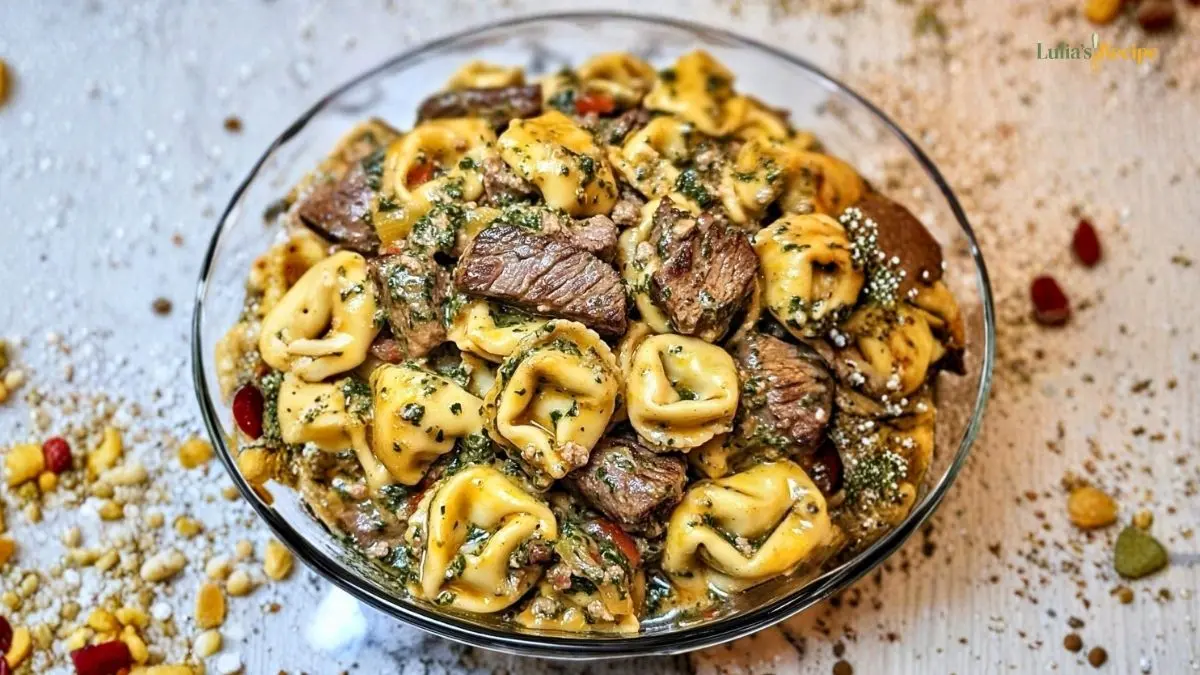
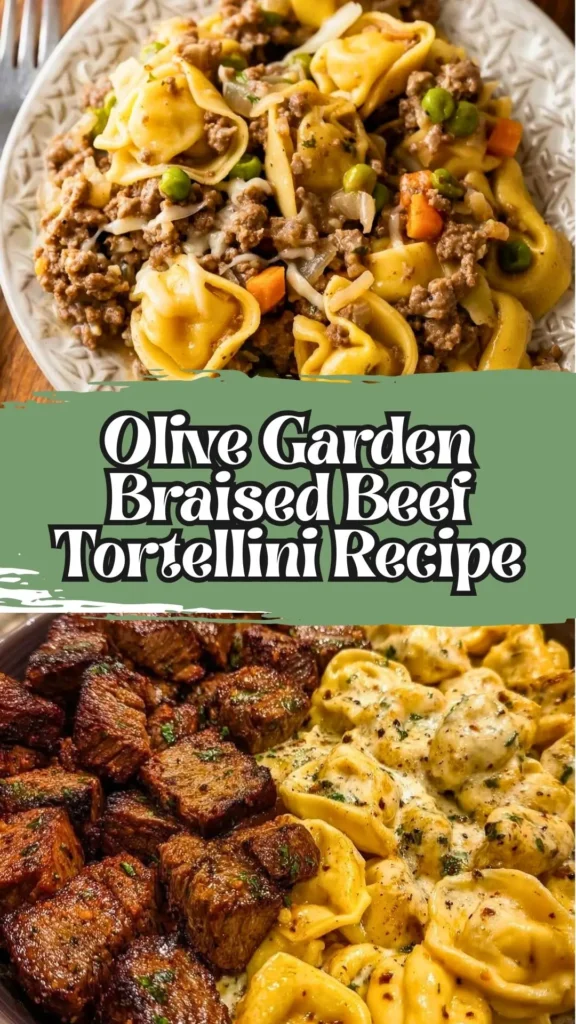
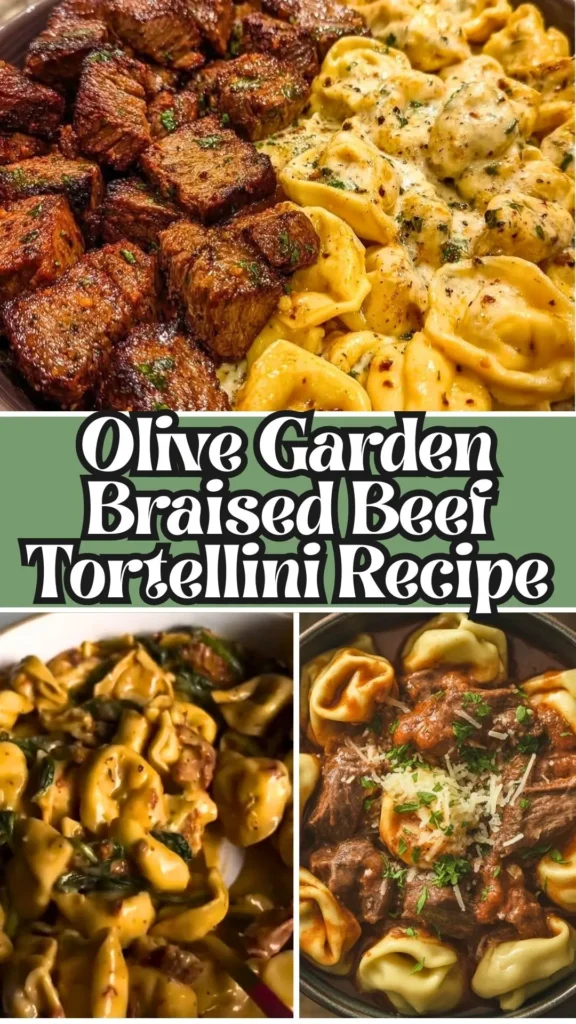
Savoring the rich, melt-in-your-mouth braised beef tortellini at Olive Garden feels like pure comfort food magic. This Olive Garden braised beef tortellini recipe brings that restaurant-quality experience right to your home kitchen.
Featuring tender beef cheeks slow-braised in a luxurious red wine and tomato sauce, paired with pillowy cheese-filled tortellini, this dish delivers layers of deep, satisfying flavors.
Perfect for a romantic dinner or a special family meal, this olive garden beef tortellini will impress everyone at your table. The secret lies in low-and-slow braising, which transforms tough meat into fork-tender perfection while creating an incredibly flavorful ragout that clings beautifully to every pasta pocket.
What Does It Taste Like?
The braised beef tortellini olive garden style offers a symphony of robust, hearty flavors. The beef cheeks become incredibly tender and buttery, absorbing the deep umami notes from the red wine reduction and savory beef stock.
Each bite delivers rich, caramelized meat flavors balanced by the bright acidity of tomatoes and the aromatic sweetness of slow-cooked onions and garlic. The cheese tortellini adds a creamy, mild contrast that complements the bold ragout without overwhelming it.
The finishing touch of fresh parsley and olive oil brings brightness and a subtle peppery note that cuts through the richness, creating a perfectly balanced dish that tastes like it came straight from an Italian trattoria.
Olive Garden Braised Beef Tortellini Recipe Ingredients
For the Braised Beef Ragout:
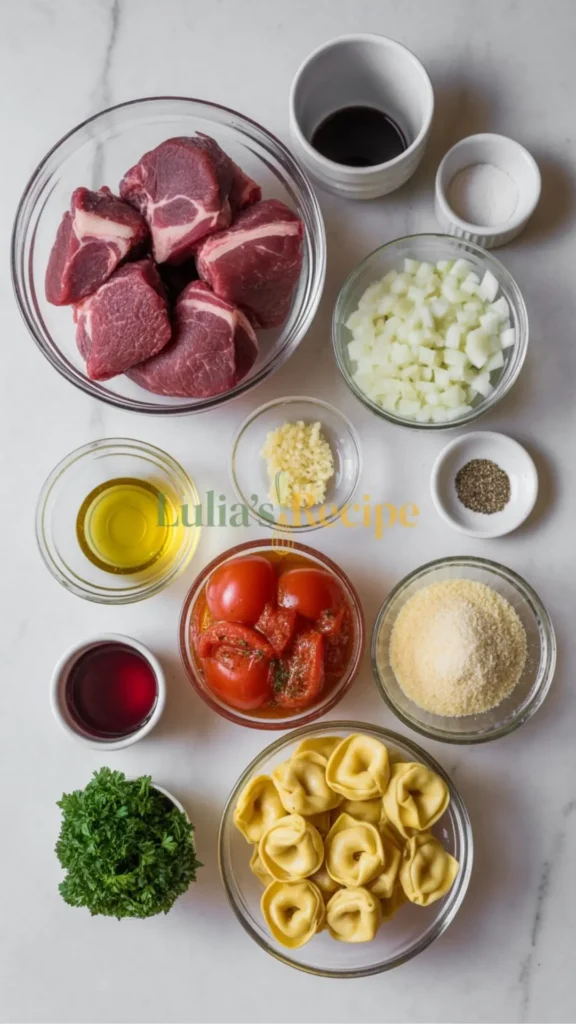
- 2 lbs beef cheeks, trimmed and cut into portions
- 2 tbsp olive oil
- 1 large onion, chopped
- 4 cloves garlic, minced
- 1 cup red wine (such as Chianti or Cabernet Sauvignon)
- 1 can (14 oz) chopped tomatoes or tomato puree
- 2 cups beef stock (preferably low-sodium)
- Salt and freshly ground black pepper, to taste
For the Pasta:
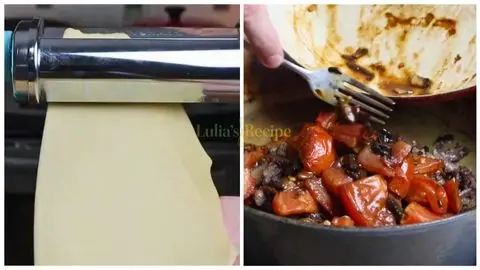
- 1 package (16-20 oz) fresh cheese tortellini
- 2 tbsp olive oil (for tossing)
- Salt for pasta water
For Garnish:
- Fresh flat-leaf parsley, finely chopped
- Extra virgin olive oil for drizzling
- Freshly grated Parmesan cheese (optional)
Kitchen Utensils
- Large oven-safe Dutch oven or heavy-bottomed pan with lid
- Sharp chef’s knife and cutting board
- Wooden spoon or spatula
- Large pot for boiling pasta
- Colander
- Tongs or slotted spoon
- Measuring cups and spoons
- Aluminum foil (if lid doesn’t fit snugly)
Preparation and Cooking Time
- Prep Time: 20 minutes
- Braising Time: 3.5 to 4 hours
- Pasta Cooking Time: 3-5 minutes
- Total Time: Approximately 4 hours 30 minutes
- Servings: 6-8 servings
- Difficulty Level: Intermediate
Olive Garden Braised Beef Tortellini Recipe Instructions
Step 1: Prepare and Sear the Beef Cheeks
Pat the beef cheeks completely dry using paper towels -this ensures proper browning. Season all sides generously with salt and freshly ground black pepper. Heat 2 tablespoons of olive oil in your Dutch oven over medium-high heat until shimmering. Working in batches if necessary to avoid crowding, sear the beef cheeks for 3-4 minutes per side until they develop a deep, golden-brown crust.
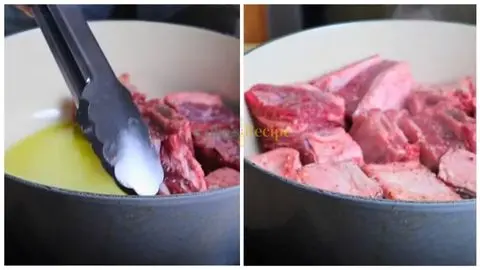
This caramelization is crucial for building flavor depth in your braised beef tortellini. Remove the seared beef and set aside on a plate.
Step 2: Build the Aromatic Base
Reduce heat to medium and add the chopped onion to the same pan, utilizing all those flavorful browned bits stuck to the bottom. Sauté for 5-7 minutes, stirring occasionally, until the onions become translucent and golden at the edges. Add the minced garlic and cook for another minute until fragrant but not burned.
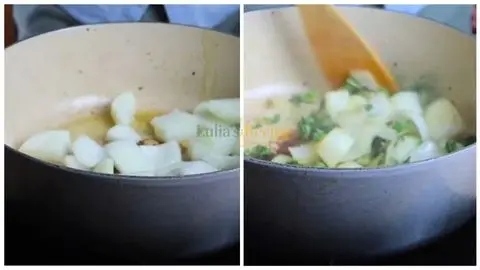
These aromatics form the flavor foundation of your olive garden braised beef tortellini sauce.
Step 3: Deglaze and Create the Braising Liquid
Pour the red wine into the pan, immediately scraping the bottom with your wooden spoon to release all the caramelized bits (fond) -this adds incredible depth to your sauce. Let the wine simmer for 2-3 minutes to cook off the harsh alcohol while concentrating the flavors.

Add the chopped tomatoes and beef stock, stirring everything together to create a unified braising liquid. Season lightly with salt and pepper, keeping in mind the sauce will reduce and concentrate during cooking.
Step 4: Braise the Beef Low and Slow
Return the seared beef cheeks to the pot, nestling them into the sauce so they’re mostly submerged with just the tops peeking out. Cover the Dutch oven with its lid or tightly with aluminum foil. Transfer to your preheated oven set at 140-150°C (285-300°F). Braise undisturbed for 3.5 to 4 hours.
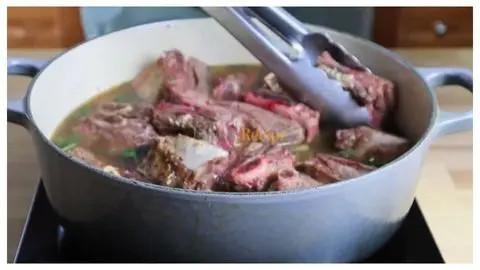
The low temperature and extended cooking time break down the collagen in the beef cheeks, transforming them into fork-tender, succulent meat that practically melts on your tongue -the hallmark of authentic braised beef tortellini olive garden style.
Step 5: Cook the Tortellini
About 10-15 minutes before the beef is done, bring a large pot of generously salted water to a rolling boil. Add the fresh tortellini and cook according to package directions, typically 3-5 minutes until they float and are tender but still have a slight bite (al dente). Fresh tortellini cooks much faster than dried pasta, so watch carefully. Drain in a colander and immediately toss with a drizzle of olive oil to prevent sticking while you finish the sauce.
Step 6: Shred the Beef and Finish the Sauce
Carefully remove the Dutch oven from the oven (it will be very hot). Transfer the beef cheeks to a cutting board and use two forks to shred the meat into bite-sized pieces, discarding any excess fat or connective tissue. The meat should be so tender it falls apart with minimal effort. If the sauce seems too thin, simmer it on the stovetop for 5-10 minutes to reduce and thicken. Stir the shredded beef back into the sauce, coating every piece in that luxurious ragout.
Step 7: Plate and Garnish
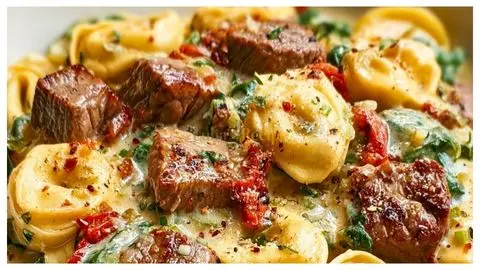
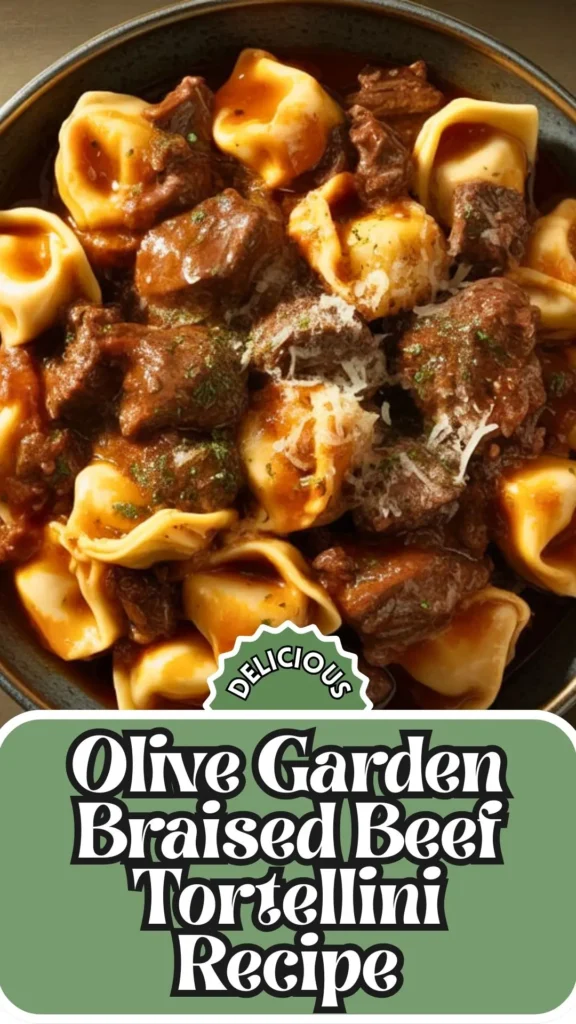
Divide the cooked tortellini among serving bowls or plates. Generously ladle the beef ragout over the pasta, ensuring each serving gets plenty of tender meat and sauce. Finish with a sprinkle of fresh chopped parsley for color and brightness, a drizzle of high-quality extra virgin olive oil, and freshly grated Parmesan if desired. Serve immediately while hot for the ultimate olive garden beef tortellini experience.
Customization and Pairing Ideas for Serving
1. Wine Pairing Enhancement
Since this braised beef tortellini olive garden recipe features red wine in the sauce, serve it with the same wine you cooked with -Chianti, Sangiovese, or Cabernet Sauvignon all work beautifully. The tannins in red wine cut through the richness of the beef while complementing the tomato-based sauce. For a more elevated experience, try a Barolo or Brunello di Montalcino, which echo the Italian inspiration of this dish.
2. Vegetable Additions
Transform this olive garden braised beef tortellini into a more complete one-pot meal by adding vegetables to the braising liquid. Diced carrots, celery, and mushrooms added during Step 2 will soften during the long braise and add nutritional value, texture variation, and earthy sweetness. Pearl onions or fennel also work wonderfully, infusing the sauce with additional aromatic complexity while maintaining the Italian character of the dish.
3. Different Pasta Shapes
While tortellini is traditional for this recipe, you can customize based on availability or preference. Pappardelle’s wide ribbons catch the chunky ragout beautifully, while rigatoni’s ridges and tubes hold the sauce perfectly. For a lighter option, try fresh egg fettuccine. Gnocchi creates an even more indulgent version, with its pillowy potato dumplings soaking up the braised beef sauce like little flavor sponges.
4. Spice Level Adjustment
Add depth and gentle heat by incorporating red pepper flakes (½-1 teaspoon) when sautéing the garlic, or stir in a tablespoon of tomato paste for deeper umami and slight sweetness. For those who enjoy bolder flavors, a splash of balsamic vinegar in the final minutes of reducing the sauce adds tangy complexity that enhances the braised beef tortellini olive garden experience without overwhelming the other flavors.
5. Herb Variations
Beyond parsley, experiment with fresh herbs to customize your olive garden beef tortellini. Fresh basil stirred in just before serving adds sweet, aromatic notes. Rosemary or thyme sprigs added to the braising liquid infuse the beef with woodsy, Mediterranean flavors (remove before shredding). A finishing sprinkle of fresh oregano or a dollop of pesto creates a completely different flavor profile while maintaining Italian authenticity.
6. Side Dish Complements
Balance the richness of braised beef tortellini with lighter sides. A crisp Caesar salad with crunchy romaine and tangy dressing cuts through the heaviness perfectly. Garlic bread or focaccia is essential for soaking up every drop of that precious sauce. For vegetables, try roasted asparagus with lemon, sautéed broccolini with garlic, or a simple arugula salad dressed with lemon and olive oil to add freshness and textural contrast.
7. Cream Enrichment Option
For an ultra-decadent version reminiscent of Olive Garden’s creamier pasta dishes, stir in ½ cup of heavy cream or mascarpone cheese during the final minutes of cooking the sauce. This creates a luxurious, velvety coating on the tortellini while mellowing the acidity of the tomatoes. The result is a richer, more indulgent braised beef tortellini that appeals to those who love cream-based pasta sauces but still want that deep braised flavor.
Essential Tips for Perfect Results
1. Choose the Right Cut of Beef
Beef cheeks are ideal for this olive garden braised beef tortellini recipe because they’re incredibly rich in collagen, which breaks down during slow braising to create that signature melt-in-your-mouth texture and silky sauce. If beef cheeks aren’t available, substitute with beef short ribs, chuck roast, or oxtail – all are well-marbled cuts that become tender with long, slow cooking. Avoid lean cuts like sirloin or round, which will become dry and tough no matter how long you braise them.
2. Don’t Skip the Searing Step
Proper browning of the beef creates the Maillard reaction – a chemical process that develops hundreds of complex flavor compounds that form the foundation of your ragout. Make sure the pan is hot enough (oil should shimmer), the meat is completely dry, and you don’t move the beef around while searing. Those dark, caramelized bits stuck to the pan (fond) will dissolve into the sauce during deglazing, contributing immense depth. Rushing or skipping this step results in a flat-tasting sauce no matter how long you braise.
3. Master the Low-and-Slow Technique
The magic of braised beef tortellini olive garden style lies in patient, gentle cooking. The low oven temperature (140-150°C/285-300°F) ensures the connective tissue breaks down gradually without drying out the meat. Cooking at too high a temperature will cause the proteins to seize and toughen before the collagen has time to convert to gelatin. Check the beef at 3.5 hours – it should be fork-tender and easily shreddable. If it’s still tough, give it another 30-60 minutes. Every oven varies, so use tenderness as your guide rather than strict timing.
4. Fresh vs. Dried Tortellini Matters
Fresh tortellini cooks in just 3-5 minutes and has a tender, delicate texture that pairs beautifully with the hearty ragout. Dried tortellini takes 10-12 minutes and has a firmer bite. Both work for this olive garden beef tortellini, but adjust cooking times accordingly. Never add pasta directly to the ragout to cook tortellini releases starch that will make your carefully braised sauce gummy and muddy the flavors. Always cook pasta separately in well-salted water, then combine just before serving.
5. Control Your Sauce Consistency
After removing the beef, assess your sauce. It should coat the back of a spoon but still flow easily thick enough to cling to pasta without being pasty. If too thin, simmer uncovered on the stovetop for 5-10 minutes to reduce and concentrate flavors. If too thick (rare, but possible if your lid wasn’t tight), thin with a splash of beef stock or pasta cooking water. The starchy pasta water is especially useful as it helps the sauce adhere better to the tortellini, creating that restaurant-quality coating you’d get at Olive Garden.
6. Time Your Components Perfectly
The biggest mistake home cooks make with braised beef tortellini is timing. The beef takes 4+ hours, but tortellini cooks in minutes. Start your braise early it can hold in a low oven (100°C/200°F) for 30-60 minutes without harm, giving you flexibility. Cook the tortellini fresh right before serving so it doesn’t become gummy or overcooked. If you must prepare components ahead, keep the cooked pasta and ragout separate, then gently reheat the sauce and toss with freshly warmed tortellini for the best texture.
7. Don’t Forget Layered Seasoning
Season at multiple stages for the most flavorful olive garden braised beef tortellini recipe. Season the beef before searing, taste and adjust the braising liquid before it goes in the oven (remember it will concentrate), and taste again after braising before serving – this is your final chance to balance salt, pepper, and acidity. A small splash of red wine vinegar or squeeze of lemon juice at the end can brighten the entire dish if the long cooking has made flavors too heavy. Finish with flaky sea salt and fresh herbs for textural and flavor contrast.
Storage and Reheating Guidance
Store leftover braised beef ragout separately from tortellini in airtight containers in the refrigerator for up to 4 days. The ragout actually improves in flavor as it rests. Reheat gently on the stovetop with a splash of beef stock, then toss with freshly cooked tortellini for best results. The sauce can be frozen for up to 3 months; thaw overnight before reheating.
Common Queries and FAQs
Here, we’ve got you covered with some common questions that people often ask.
Can I make this braised beef tortellini olive garden recipe in a slow cooker?
Absolutely! After searing the beef and building your aromatics on the stovetop, transfer everything to a slow cooker. Cook on LOW for 7-8 hours or HIGH for 4-5 hours until the beef is fork-tender. The slow cooker method works beautifully for this recipe and requires even less attention than the oven method.
What’s the best substitute if I can’t find beef cheeks?
Beef short ribs are the closest substitute in terms of richness and texture. Chuck roast (cut into large chunks) also works well for braised beef tortellini, though it’s slightly less rich. Oxtail creates an incredibly flavorful sauce but requires more effort to remove bones after cooking.
Can I use dried tortellini instead of fresh?
Yes, dried tortellini works perfectly fine for this olive garden beef tortellini recipe. Just increase the cooking time to 10-12 minutes according to package directions. The texture will be slightly firmer and chewier compared to fresh, but it still pairs wonderfully with the rich ragout.
How do I know when the beef is done braising?
The beef cheeks should be so tender they fall apart easily when pierced with a fork. You should be able to shred them effortlessly without sawing or cutting. If there’s any resistance, continue braising for another 30-60 minutes and check again.
Can I prepare the braised beef ahead of time?
This is actually an excellent make-ahead dish! The beef ragout can be made 1-3 days in advance and stored in the refrigerator. The flavors will deepen and improve as they meld. Simply reheat gently on the stovetop and cook fresh tortellini just before serving for the best texture.
What wine should I use for braising?
Use a dry red wine you’d enjoy drinking – Chianti, Sangiovese, Merlot, or Cabernet Sauvignon all work beautifully. Avoid cooking wines with added salt, and don’t use expensive bottles, but don’t use undrinkable wine either. The wine’s flavor concentrates during cooking, so mediocre wine will produce mediocre results.
Why is my sauce too watery after braising?
If your lid wasn’t tight or you used too much liquid initially, the sauce may be thin. Simply remove the beef, place the pot on the stovetop, and simmer uncovered for 10-15 minutes, stirring occasionally, until it reduces to your desired consistency. This also concentrates the flavors, making your olive garden braised beef tortellini even more delicious.
Can I freeze this dish?
Freeze the beef ragout (without the pasta) in airtight containers or freezer bags for up to 3 months. Thaw overnight in the refrigerator, reheat gently on the stovetop, and serve with freshly cooked tortellini. Never freeze cooked pasta, as it becomes mushy upon reheating.
Olive Garden Braised Beef Tortellini Recipe

Savoring the rich, melt-in-your-mouth braised beef tortellini at Olive Garden feels like pure comfort food magic. This Olive Garden braised beef tortellini recipe brings that restaurant-quality experience right to your home kitchen.
Ingredients
- 2 lbs beef cheeks, trimmed and cut into portions
- 2 tbsp olive oil
- 1 large onion, chopped
- 4 cloves garlic, minced
- 1 cup red wine (such as Chianti or Cabernet Sauvignon)
- 1 can (14 oz) chopped tomatoes or tomato puree
- 2 cups beef stock (preferably low-sodium)
- Salt and freshly ground black pepper, to taste
- 1 package (16-20 oz) fresh cheese tortellini
- 2 tbsp olive oil (for tossing)
- Salt for pasta water
- Fresh flat-leaf parsley, finely chopped
- Extra virgin olive oil for drizzling
- Freshly grated Parmesan cheese (optional)
Instructions
Step 1: Prepare and Sear the Beef Cheeks
Pat the beef cheeks completely dry using paper towels -this ensures proper browning. Season all sides generously with salt and freshly ground black pepper. Heat 2 tablespoons of olive oil in your Dutch oven over medium-high heat until shimmering. Working in batches if necessary to avoid crowding, sear the beef cheeks for 3-4 minutes per side until they develop a deep, golden-brown crust. This caramelization is crucial for building flavor depth in your braised beef tortellini. Remove the seared beef and set aside on a plate.
Step 2: Build the Aromatic Base
Reduce heat to medium and add the chopped onion to the same pan, utilizing all those flavorful browned bits stuck to the bottom. Sauté for 5-7 minutes, stirring occasionally, until the onions become translucent and golden at the edges. Add the minced garlic and cook for another minute until fragrant but not burned. These aromatics form the flavor foundation of your olive garden braised beef tortellini sauce.
Step 3: Deglaze and Create the Braising Liquid
Pour the red wine into the pan, immediately scraping the bottom with your wooden spoon to release all the caramelized bits (fond) -this adds incredible depth to your sauce. Let the wine simmer for 2-3 minutes to cook off the harsh alcohol while concentrating the flavors. Add the chopped tomatoes and beef stock, stirring everything together to create a unified braising liquid. Season lightly with salt and pepper, keeping in mind the sauce will reduce and concentrate during cooking.
Step 4: Braise the Beef Low and Slow
Return the seared beef cheeks to the pot, nestling them into the sauce so they’re mostly submerged with just the tops peeking out. Cover the Dutch oven with its lid or tightly with aluminum foil. Transfer to your preheated oven set at 140-150°C (285-300°F). Braise undisturbed for 3.5 to 4 hours. The low temperature and extended cooking time break down the collagen in the beef cheeks, transforming them into fork-tender, succulent meat that practically melts on your tongue -the hallmark of authentic braised beef tortellini olive garden style.
Step 5: Cook the Tortellini
About 10-15 minutes before the beef is done, bring a large pot of generously salted water to a rolling boil. Add the fresh tortellini and cook according to package directions, typically 3-5 minutes until they float and are tender but still have a slight bite (al dente). Fresh tortellini cooks much faster than dried pasta, so watch carefully. Drain in a colander and immediately toss with a drizzle of olive oil to prevent sticking while you finish the sauce.
Step 6: Shred the Beef and Finish the Sauce
Carefully remove the Dutch oven from the oven (it will be very hot). Transfer the beef cheeks to a cutting board and use two forks to shred the meat into bite-sized pieces, discarding any excess fat or connective tissue. The meat should be so tender it falls apart with minimal effort. If the sauce seems too thin, simmer it on the stovetop for 5-10 minutes to reduce and thicken. Stir the shredded beef back into the sauce, coating every piece in that luxurious ragout.
Step 7: Plate and Garnish
Divide the cooked tortellini among serving bowls or plates. Generously ladle the beef ragout over the pasta, ensuring each serving gets plenty of tender meat and sauce. Finish with a sprinkle of fresh chopped parsley for color and brightness, a drizzle of high-quality extra virgin olive oil, and freshly grated Parmesan if desired. Serve immediately while hot for the ultimate olive garden beef tortellini experience.
Notes
Store leftover braised beef ragout separately from tortellini in airtight containers in the refrigerator for up to 4 days. The ragout actually improves in flavor as it rests. Reheat gently on the stovetop with a splash of beef stock, then toss with freshly cooked tortellini for best results. The sauce can be frozen for up to 3 months; thaw overnight before reheating.
Nutrition Information:
Yield:
6Serving Size:
1Amount Per Serving: Calories: 260
I’d love to hear your thoughts-leave a comment on the blog and let me know How it came out! Don’t forget to follow me on Pinterest, Facebook and YouTube for more delicious updates. Your support truly means everything to me.